Monday, May 30, 2011

Frappe secrets revealed...

It's summer time and we all know what that means, frappe season is upon us! Frappes are the ultimate solution to breakfast when you have that "gotta hurry up and get it done early before it gets super hot, don't have time for breakfast" mentality, or when it's afternoon and you need an icy cold pick me up. Some of you know that I have been working to perfect my frappe making skills since last summer when I got shamefully addicted to McDonald's caramel frappes. I later discovered that Sonic has a pretty good hazlenut java chiller, but it's totally different. The difference in these two is that McD's is more icy while Sonic's is more like a coffee milk shake. When I started out in my quest to replicate, I searched the web and found that there was surprisingly little information out there in the form of a make at home recipe. Most of the few recipes that I did find wanted you to use special powders and or make simple syrups which isn't hard but it's hot and sticky and lets face it that's just another step. I purchased some coffee syrups instead of going to the trouble. I also came up with the plan that if I froze my coffee in ice cube trays  I could both flavor the frappe as well as combat the disappointment that happens at the end when you have watered down, nearly tasteless slush. I have since altered even that recipe and resorted to using cold coffee in liquid form. Now that I've bored you with the why, I will get on with the how. I highly recommend that you get a "Ninja" blender. This is by far the best blender thing I have ever owned. If your blender does a great job with ice and doesn't leave you chunks that get stuck in your straw, go for it. Otherwise, go to the store and make the investment, you will not be sorry. I use the large pitcher, as it obviously gives more area for things so mix. I add 3 regular size scoops of vanilla ice cream, not like "Baskin Robbins" size scoops, just like once across the top of the bucket scoops. I add to that about 3/4 of a cup of the coffee brew of your choice, I have found that hazlenut makes it awesome. I use my caramel ice cream topping syrup and make about 5 laps around the pitcher. If you don't like caramel you're probably going to have to use a plain simple syrup, but I like caramel so I haven't had to worry about that. I have also found that the 5 lap rule applies to chocolate syrup as well. If you like it less caramely or chocolatey or less sweet, feel free to adjust that amount. I add 5 pieces of ice. If you like it more milkshakey, add 1-2 less, but if you like it more icy as Henry does, add 1-2 more. I do not add milk to my frappes as I find that it makes it too liquidy. I'm also not sure that all these words ending in y are real words, but I don't care. Pulse blend this concoction until you stop hearing ice hitting the pitcher, that will tell you that you have a perfectly well blended frappe that won't choke you because you sucked a chunk of ice down your throat. I will also add my personal thoughts about cups.

 Joann has a fantastic reusable cup for frappes (or milkshakes). It's sturdy clear plastic so you can see what's going on in it, it has a screw on lid so you don't spill, it has a silicone grip band so you don't drop it and it also prevents your hand from freezing while you hold the cup, and it has a hard plastic straw that won't collapse and has a bit of a propeller type thing on the bottom so that you can re-mix your drink should you need to. They also come in different colors so you can get one for every member of your family for milkshake night.


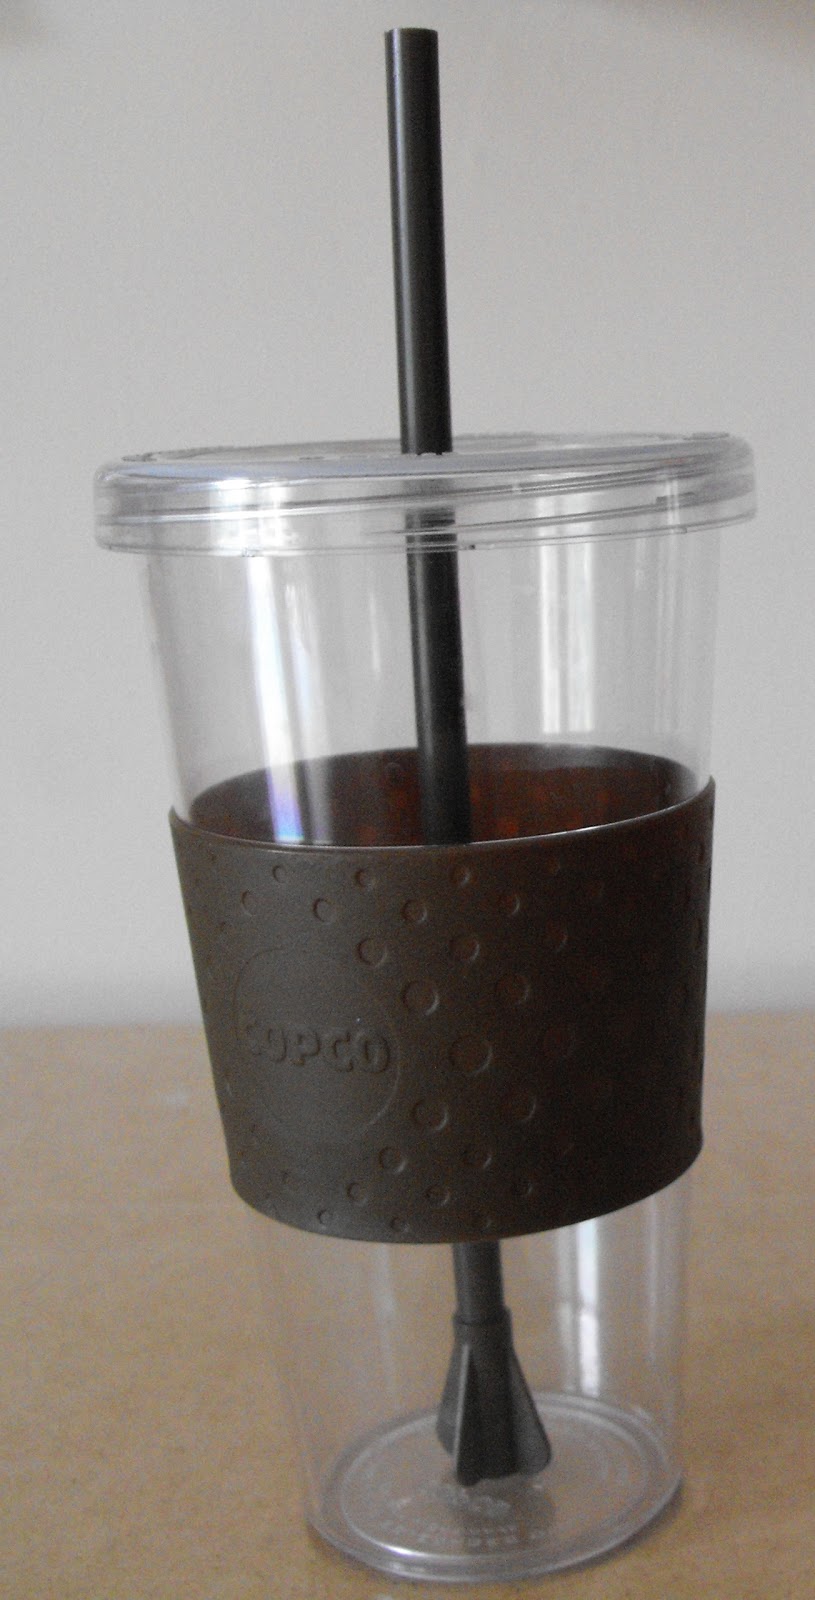
Starbucks also has a good reusable frappe cup. It is called the "Via" is is actually intended to be used with their new instant coffee. You will notice that it is also a sturdy clear plastic with a silicone grip. It has a screw on "sipper" top with a tab you can close to prevent spills rather than a straw but you can easily add a straw if you get a long one like the ones from Sonic or McDonald's big cups. You will notice that it also has a propeller type thing on the bottom, but unlike the Joann Cup it is mounted on a twisted stick (think drill bit). This stick has a tab on the top and when you move the tab up and down, the propeller spins thus mixing your drink. This mixing apparatus is far more thorough than the paddle on the straw, but the straw thing works fine for the minimal amount of stirring you might need to do. *Note* Do not use the mixer while your straw is in the cup as it might maim said straw. You know that comes from personal experience.
So there you have it friends, the culmination of my frappe studies. I hope that you enjoy making your own frappes in this simple on hand manner. Feel free to tweak the recipe to your liking, and don't hesitate to use flavored coffees or perhaps even flavored creamers to create your perfect summer frappe. -Kellie-

Friday, May 27, 2011

Our big weekend plan

A few weeks ago our nephew Aron graduated Suma Cum Laude with honors from Murray State University, the alma mater of his mother and his Uncle Henry.


This weekend, he will be moving to Mississippi so that he can attend Ole Miss and get his PhD in chemistry.

I really hope that I didn't get those facts confused, but if I did you still get the picture. Anyway, after moving him out of his dorm after graduation, I realized that he didn't really have much stuff. I suppose that's kind of good, but kind of bad. On the good side, it's fast and easy to move him home at the end of the year, things he didn't own were provided,  and he had everything he needed. On the bad side, since he is moving into an apartment (he's had enough of dorm life and I don't blame him) he has pretty much nothing. No bed, no storage, nothing to eat on, nothing to do homework on, and nothing to put his tv on. ;) I asked him what he was going to do about furniture, and he said he really didn't know. That didn't sit well with me. He's a super great guy and works really hard to do well. Given those facts, I decided to make it my personal mission to make sure that he had enough stuff to live comfortably until he can get better stuff. We had a worn out love seat that we decided to contribute. It has a slip cover so it's not so bad anymore, and if he spills beer juice on it he can take the cover off and wash it. I also had an end table to add. I talked to a friend who also had a few things to add. Now I was getting somewhere. I hit the local Goodwills and got him some dishes and such. I had Henry ask around at work and see what he could find. Full size bed, jackpot. I still lacked some clothing storage and maybe a few other things.  My friend who contributed things knew someone who was moving. They lived in what she called "a ritzy neighborhood". This was good, very good. She said they had a desk and a dining table. That was most of my remaining "want" items, leaving me only to find a chest of drawers for his clothes. Henry picked up a U-Haul trailer and hooked it to the van so that we could start gathering the items. We rolled up at the house to pick up the items, and when we went in we found that we had hit the jackpot! She had lots of stuff, nice stuff, that she wanted to give us. She didn't want to move it, they had had it for a while, they got some of it for free at some point anyway, and she wanted it to go to a good home where someone would use it. We scored an extemely heavy desk, a leather chair, a file cabinet with a hutch that I plan for him to use as a chest of drawers/clothing storage, and another filing cabinet that looks like a low dresser that I figure he can put more clothes in and his tv on top of. All of those things looked as though they came from a law office. Super score! The dining table (which also had a matching china cabinet) was too big for him to use, but my friend had a small one so we traded :) On the way out, the jackpot lady added that she had a hutch for the desk, as well as a random (sorta shabby) bookcase in the garage. We carted off those items too. So I headed home with my little trailer filled with goodies and the thought that Aron will have a place to eat, sleep, hang out and study. When Henry got home he unloaded the trailer as I suspected, and we repacked it as tightly as possible including his contrubution of the bed. We ran out of room (shoulda gotten a bigger trailer but we didn't know that we would score so much free stuff) so my table and Goodwill finds ended up in the van and the couch? Well, the couch is tied to the roof of the van like the Clampets. It's going to be a long 4 hour trip (or longer) while towing a U-Haul trailer and trying to keep the kids quiet and happy. On top of that we found out that his apartment is on the second floor, Lord help us with that extremely heavy furniture. Provided that no one gets mamed or killed, we will be back home tomorrow night. I'm sure we will all be really tired and possibly sore, but it doesn't matter, because that's what you do when you're a family, you help each other out.

Taking one for the team- the fence part I

This is how our house looked before our last project began. It looks pretty normal, but we have never liked the fence in this location.


 If you look at the middle right, you will see why the meter man didn't like the fence in this location. If you look at the middle left side of this picture, you will see one of the main reasons that I did not like the fence in this location. You can see that there are little trees growing there, but what you can't see are the tree roots from the giant pine tree that we cut down, and the poison ivy... Henry is very allergic to this evil plant, so in an effort to spare him the pain and suffering that it brings, I carefully (or so I thought) removed it myself. I did save him from getting it, but in doing so I subjected myself to it and its evil oils. I like to think that I took one for the team.


So here is the after version of our fence project.

My intention is to extend the flower bed/landscaping in the front so that it curves around the corner and in front of the fence. I'm planning to add a miniature weeping cherry in there somewhere. That will probably not happen until next spring. At some point, we will complete part II of our fence project. In that part, we will move the side of the fence over to the easement on the street and extend front of the fence to meet it. It will be nice to have a large private backyard, instead of a small backyard and a side yard that we don't use. I think that we will be getting a small bobcat to level the yard and create a terraced section at that time in order to get the biggest bang for our effort. So there you have it, our latest semi major project. ;)

Friday, May 20, 2011

Recent Crafty Projects

 So part of the reason that I haven't posted more recently is because I've been doing lots of sewing and embroidery projects. I'm pretty proud of my recent projects. Some I've made to sell on my Etsy site, and some I made just for us or family. I'm soing to start off with what I've made for us and family.

This is my mom's mother's day gift. It's an embroidered canvas of our family tree using stick figures. 


This is his mom's mother's day gift. It's an embroidered pillow of their family tree using stick figures.


This is a Hawaiian shirt that I made Henry. He was drawn to this pattern so I whipped him up this shirt.


 Burp cloth for a friend.
 Burp cloth for another friend.


Burp cloth for a friend to give to a friend. ;)


OK, on to Etsy things.

This little gem has become my bread and butter. I have been selling them like hotcakes, and personalizing them to match the kid they are for. I've done brown, blonde, and red hair, as well as one with glasses.


This is an altered version of an invitation that I already make.

I have high expectations for this Lego Harry Potter invite/banner. I haven't taken pictures of it as a banner yet, but they are coming soon. I'm also working on a Ron and Hermione cutout.


Here are some custom piddle pads (my signature product) I've made.

This one is for a toddler car seat. She ordered 4. :) They are larger than the original and at her request have vinyl in them for potty training.
 This one is actually a shopping cart pad. I made the top taller and omitted the crotch strap piece. I also made the cut out in the middle more narrow.


Here is a set of custom appliqued and embroidered piddle pads for a set of twins.


 I have several more products that I am working on, and will of course post pics when I am finished. :)

Let's start with the most recent project...

In an effort to catch up my blog, I will just start with the most recent project and work backward. Let me shorten up the story some by saying that we had a flower bed that went around the front porch. We had done some work to it last year by planting flowers and adding mulch. Long story, but we later installed some landscape lights along both sides of the front walk and as a quick fix we tossed some mulch over the cords. This spring, grass grew up through the mulch and looked awful. We spent 2 days basically cutting sod (which we used to fill in some bare spot in the yard) so that the grass would be gone. We gave the new flower bed a new shape and put down plastic to discourage future weed growth. I also installed some edging to keep the grass out and the mulch in. The sad thing is that we did all that and then realized that we didn't have money in the budget to get  mulch or  flowers. Semi fail, as people driving by had to view our empty plastic covered flower bed. My friend and I were talking about flowers and I said I wanted to put in some monkey grass and she asked why because she had some that she hated and wanted to get rid of... see where this is going?  So yesterday, I went to her house and dug up some of her huge monkey grass, although I'm pretty sure it's actually mondo grass but no matter because it serves the purpose.

This gives you the basic idea of what we had created to begin with.


So then I added the grass that I got from my friend and a transplanted coreopsis and got this.


So this morning I went and got some flowers to fill in, and some mulch to finish it off. I lucked out and found the mulch 5 bags for $10! Shazaam! I got 10 bags for good measure. ;)
So this is what I ended up with. I should also add that these pictures do not do it justice as it looks way better than they reflect. I also mowed the grass.


So there you have it, my landscaping adventures for today. I'm hoping that the blanket flowers that I moved perk back up as I think they are in shock. :(  I also mulched around the mailbox and translplanted a monkey grass to replace the one that croaked. Now if I can just remember to water the plants until they are established, I'll be doin all right.

Thursday, May 19, 2011

Bad bloggers and busy bees

So I haven't blogged in a few weeks, but I have a good reason; I've been a busy little bee! I've barely had time to turn around and it's been great. Honestly I hope the trend continues. I've had projects goin' on around the house and my Etsy stuff has been going pretty well, not to mention all the sewing projects I've been doing for friends and family. I will post a massive blog when I have time to breathe again. You can expect pictures, explanations and more! 'Till then, be assured that the projects are racking up and the next blog will be fun and exciting. I might even have to break it up into 2 posts :) -Kellie-

Wednesday, May 4, 2011

All hail Ikea!

We have an Ikea love seat in our den. We got it at his office at a sweet deal, and it was barely used. It came upholstered in white canvas, which we knew would never work in this house, so I got some pleather (yes I should have sprung for vinyl) at a super cheap price and I recovered the couch. Not only are the lines on this couch very smooth, it comes apart in sections which is super handy when recovering. I took it apart, covered the pieces individually, and put it back together. Not only is that feature super handy when recovering, it's also super handy when, oh I don't know, say your kids lose things in the couch, then spill whatever that was on it and don't tell you. I took the couch apart, cleaned all the pieces (yay pleather) and put it back together clean as new, and with a fresh lemon scent (yay Clorox wipes). I almost think that most furniture should be made like Ikea furniture, especially couches. Their couches frequently come with slip cover options, and they have special clips that keep it on and don't just rely on tucking it in. This makes for a nice taught covering instead of a jumbled mess that looks like that beach towel you threw on your car seat because your swim suit was wet. The covers can be taken off and washed, or if you decide you want a different print, just order a new one instead of buying a new couch. I also like the fact that you can take the couch apart it if you for example, move into an upstairs apartment, or the couch won't fit through the door of your house. There would be no awkward tilting and shifting and no one would have to walk backward or have their fingers caught between the door frame and the couch. I'm also thinking that people with kids should just get Ikea couches. Let's face it, they are cheap enough that after you've abused used it for many years, you can afford to leave it on the curb one night and get a new one. The couches that I have sat on from Ikea aren't as comfy as the Lazy Boy we have in our living room, but they are affordable furniture, and I think they have an "upper deck" class of furniture that was out of the range I was willing to pay so it might be just as comfy, I really don't know. Anyway, I salute Ikea today for being modular and having bolts with wing nuts that allow you to clean where you normally couldn't.

Sunday, May 1, 2011

Remodeling progress of the living and dining rooms


After we did the bathrooms, we did the living room and the dining room. Here are some before pictures.

Unfortunately, we still have the pink carpet. We were slated to get rid of it, but decided to do other things instead. We did actually use the fireplace once, but it really messed up a few allergies so we vowed to not use it again. I did add a few split logs and some candles to keep it from being a total black hole.


In the picture on the left, there is more wallpaper. It was this flowery striped nightmare. You will also see that there is an arrow on the wall and the caption above it reads "shiny silver holographic switch plate". Man,that must have been stylin' on the USS Enterprise where I'm sure they got it from. In the picture on the right you will see that the stairway is painted yellow. It's actually not a bad yellow- more of a sunflower color really, and yes I did that, and the hallway was painted that color but I got sick of it. I had enough of various  leftover paint that I mixed together in a 5 gal. bucket and created a lighter gray. I wish I had had enough of it to repaint the stairway, but I didn't. I am open to suggestions as to what color to repaint the yellow. Post a comment or email me your ideas.

 
You will see in the picture on the left, a circled area on the wall. That's a phone jack. That doesn't seem like a big deal until you realize that the phone jack wasn't really there, it was on the opposite side of the room and they had run phone line along the baseboard, over the doorway, and around to that spot. The entire house was like that, inside and out. There was cable and phone line around almost every doorway. I wish I had measured it so that I could post how much there really was. Here's a hint: It was so bad that when we had cable hooked up to the house, the cable guy literally ripped out everything and reinstalled new inside and out. We got a new line run to the house, and a new cable box outside that wasn't filled with splitters and junctions.


There were bifold doors going from the living room to the dining room. If that's not 1980, I don't know what is. Below are a few little "extras" they felt the need to leave us. On the left is an upholstered cornice box. It was over the windows in the living room, and blocked a huge amount of light. We found some sucker on craigslist to come and get it. On the right is a picture of the dining room before the wall was taken out. Nice heavy drapes, dark striped wallpaper, and all the space of a closet.


I suppose I couldn't complete the downstairs blog without showing a little demo.

This is the wall between the dining room and the kitchen. You can see the old back door and the lack of light. Just look at how little Jonas was. hehe

This is the disaster we lived with for at least a month. The ceiling was scraped, the walls had mud (remember that we had to paint over the wallpaper since the idiots contractors put it up directly on top of the unprimed drywall), there was dust everywhere, and we basically couldn't use the kitchen.


Just for comparison, here's an after shot.


Here's another thing that had to be changed out in the kitchen.


From super shallow, to fairly deep. We ditched the old faucet and sprayer as well, and added an all in one unit.

Last but not least, here's a before and after shot of the back of the house.